Monday, December 27, 2010

Dumplin's

This isn't a baking entry; this is a cooking entry! Whoa!
But it's not REALLY cooking, so..it's okay.
These are "dumplins", NOT "dumplings." That's just way too formal. I'm talking "we gotta cook up some dumplins" here! And this recipe is for chicken/turkey based dumplins, but you can use beef stock/juices instead.
My dad grew up eating these, but I consider them a special treat. I'd never even made them before today! It was actually really fun making them. You have to make sure that the liquid is hot enough, because it helps bind the ingredients and draws them off of the spoon.
Dumplins are cheap, easy, and sooo tasty. And they're so good dipped in ketchup!

Dumplins Recipe
  • 2 cups flour
  • 4 eggs
  • 1/4 c milk
  • 2 containers chicken stock (not broth)
  • Optional:
  • If you decide to cook a chicken or turkey, you can use the leftover juice with the chicken stock! Dumplins are a good "day after" meal, for if you have chicken or turkey!

Preparation

  • Put the chicken stock (and optional chicken/turkey juice) in a large pan. Bring to a rolling boil.
  • Put the eggs in a large bowl. Break the yolks and stir to combine.
  • Add in the flour and milk, and FOLD together with the egg.
  • NOTE: Rough stirring will add too much air, which will make them large and flat. Hence folding!
  • NOTE: The mix will be thick, like a heavy dough. You want it this way!
  • Turn the stock down to medium-low. Scoop about 3/4 spoonful of the mix and dip in the mixture. When hot enough, the stock will draw it off of the spoon.
  • Repeat until the bowl is empty of mix. Cook dumplins for 10 minutes minimum.
  • After 10 minutes, cut one open to make sure it's done inside.
  • Serve as a side or as a meal, with or without ketchup!

Tuesday, December 21, 2010

Spritz Cookies

Phew! Finals are over, I'm waiting for grades to be posted, and it's so close to Christmas that I'm frolicking everywhere.

And I thought, what better treat to make to celebrate the holidays than spritz cookies??
I Googled "Best spritz cookie recipe" and this is the one I found. Now, I like mine more buttery and sweet, and these are a little more tangy, so there's your warning. They're still delicious, but in a different way.
I got my roommate to help me, too! She bought me the spritz gun (as I so lovingly call it) for my birthday, but I haven't used it until now. It's so fun! This recipe is made for use with a cookie press (gun) and it makes a looot of cookies.
I did three different designs, and used three different sprinkle colors. The trees got green, the roundish ones got blue, and the.. diamond ones..? got red! Very festive.

The recipe online said to cook them for 10-12 minutes, but when I cooked by first batch for 10, it burned. I was so sad! I burnt a whole tray of trees. So I suggest starting at 6 minutes, and then going from there.

Best. Roommates. Ever.


Spritz Cookie Recipe

  • 1 cup butter-flavored shortening
  • 1- 3oz package cream cheese, softened
  • 1 cup white sugar
  • 1 egg yolk
  • 1 tsp vanilla extract
  • 1 tsp orange zest
  • 1/2 tsp salt
  • 1/4 tsp cinnamon
  • 2 1/2 c all-purpose flour
  • Sprinkles for looks

Preparation

  • Preheat oven to 350
  • In a medium bowl, cream together shortening, cream cheese, and sugar.
  • Beat in egg yolk, vanilla, and orange zest. Beat until light and fluffy.
  • Beat in salt and cinnamon, then gradually add flour. Mix until well-combined.
  • Choose the design you want, fill the tube of the cookie press, and form your cookies on an ungreased, un-parchment-papered cookie sheet.
  • Sprinkle with sprinkles (Crazy!) before putting in oven.
  • Bake 6-8 minutes, removing when edges just begin to turn golden brown.
  • Remove from pan as soon as you can, letting them cool on a cooling rack instead.

Tuesday, December 14, 2010

Delay

FINALS WEEK! AHHHHH!

All that means is that I'm not baking yet this week.
But I'm going to make spritz cookies after this is all done, so you have that to look forward to!

Wednesday, December 8, 2010

Brownie Bites

My writing group had a holiday party on Monday, so I (obviously) decided to make some treats!
I did the cinnamon pinwheels that I love so much, but also made brownie bites and a chocolate buttercream to go on top!
It was the frosting that made these things! The brownie was your typical brownie, and the frosting was your typical chocolate frosting, but together.. I may start drooling just typing this up!
These can either be really good for you, or really bad. You can grab one and it's rich enough for you to be able to walk away. But then..you might walk back a dozen times to get more.
Brownie Bite Recipe
  • One package box brownie mix
  • Eggs (varies)
  • Vegetable oil (varies)

Preparation

  • Preheat oven to 350
  • Mix brownies according to directions on back of box.
  • Grease a mini-muffin pan, fill 3/4 way full with brownie mix.
  • Bake for 10-12 minutes, and check with a toothpick. Be careful not to overcook, because they'll become dry and crumble.
  • Let them completely cool before removing them from the pan.

Chocolate Buttercream Recipe

  • 11 tbsp butter (1 stick + 3 tbsp), softened
  • 1 - 2lb bag powdered sugar
  • 2 tsp vanilla
  • 1/2 tsp salt
  • 2/3 c milk
  • 3 tbsp cocoa

Preparation

  • Combine butter, vanilla, salt, 3/4 of the powdered sugar and 3/4 of the milk.
  • Blend until well combined, adding more powdered sugar or more milk when needed.
  • Once you reach the consistency you desire, add in 3 tbsp cocoa (mix on low speed to avoid cocoa-fying your clothes!)

Monday, November 29, 2010

Oreo Snowmen

So I've repeated the Oreo Balls recipe yet again, but come on-- how cute are these little snowmen!
I wanted to take something fun to my writing group, and they'd been requesting more oreo balls since I took in the oreo ghosts, so in response to the chilly weather today I whipped these guys up.
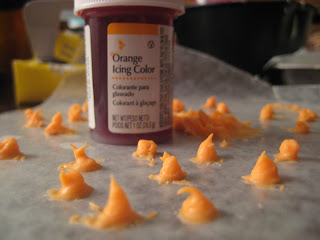
At first I made them the size of regular oreo balls, but I was running short on time, so I figured 15 huge ones were easier to dip than 30 little ones. And they were! Then I used a regular toothpick to carve the eyes and mouth. But first went on the nose! For the nose, I melted one square of almond bark and then used a gel-based food coloring to turn it orange. The noses were about the size of a pencil eraser (the visible part on a new pencil, not the whole eraser.) I used a toothpick to dab some globs of A.B. onto a piece of wax paper, and used the toothpick to get the right shape.

These are my favorite oreo creations yet! If anyone can think of any more shapes to try, let me know!

Speaking of favorites, here are some of the members of my favorite group! (Thanks for posing for me!!)


Oreo Snowmen Recipe

  • 1 package Oreos, crushed
  • 1 package full-fat cream cheese, softened
  • 1 package white Almond Bark

Preparation

  • Either crush Oreos or blend in a food processor.
  • Using an electric mixer, blend cookies and the cream cheese together. Chill while working on the noses.
  • Melt one square from the Almond Bark block, then add in orange GEL-based dye until it reaches the color you want.
  • On a sheet of wax paper, use a toothpick to shape drops of a.b. and form to a rounded cone-like shape.
  • Leave those to harden and take the oreo mix from the fridge. On a separate sheet of wax paper, use your hands to roll mix into balls (mine were probably around two inches in circumference, but you can pick the size.) Put in freezer.
  • Chop and melt the remaining almond bark.
  • Drop balls into a.b., one by one. Use a plastic spoon to make sure it's completley covered, then use a toothpick to retreive it from the a.b. Tap off excess and place on wax paper to dry.
  • When mostly dry, press a dried nose into each ball. When completely dry, use a toothpick to create the coal-eyes and coal-mouth.

Thursday, November 25, 2010

Pumpkin Cupcakes

Happy Thanksgiving!
or
Happy Gluttony and Coma Day!


I think that it's obvious by now that I like baking, but SURPRISE! So does my mom!

More specifically, she likes baking CUPCAKES. And I don't just mean regular chocolate or vanilla, either.
For my birthday she made Reese's cupcakes, and lemon cupcakes.
For dad's birthday she made German chocolate cupcakes.
She's also made amazing banana split cupcakes, Twix cupcakes, rocky road, key lime, toffee, white chocolate with raspberry cream cheese, caramel apple...

And for Thanksgiving, she made pumpkin cupcakes!


Pumpkin with cream cheese frosting and sugared pecans

She makes the cupcakes themselves from a box mix, and then makes the frosting (and any other toppings) from scratch.

For these pumpkin cupcakes she added in a can of pumpkin. Then, the amazing and ambitious person she is, she made two different types of frosting: Cream cheese frosting (topped with sugared pecans), and maple buttercream (sprinkled with cinnamon).

Pumpkin with maple buttercream frosting, sprinkled with cinnamon

Included below are both frosting recipes, for your convenience. You don't have to make them both at the same time!

Pumpkin Cupcakes Recipe

  • 1 box Betty Crocker SuperMoist yellow cake mix
  • 1 small box vanilla pudding
  • 1 c. sour cream
  • 1 - 15oz can pumpkin (NOT pumpkin pie mix)
  • 1/2 c water
  • 1/3 c vegetable oil
  • 4 eggs
  • 1 1/2 tsp pumpkin pie spice

Preparation

  • Preheat oven to 350
  • Line a cupcake pan with 24 cupcake papers
  • Combine cake mix, pudding, sour cream, pumpkin, water, oil, eggs, and spice (aka all ingredients) in a large bowl.
  • Beat with electric mixer on low for 30 seconds. Beat on medium for 2 minutes, scraping bowl occasionally.
  • Divide among cupcake cups (about 2/3 full).
  • Bake 20-25 minutes, or until toothpick comes out clean.
  • Cool completely.

Maple Buttercream Frosting Recipe

  • NOTE: This recipe has been doubled to allow enough frosting to pipe
  • 2 -8 oz packages full-fat cream cheese
  • 1 stick butter, softened
  • 2 tsp vanilla
  • 1 tsp maple extract
  • 8 c powdered sugar
  • Cinnamon (optional)

Preparation

  • Cream the cream cheese and butter until well combined and fluffy.
  • Add in vanilla and maple extract, and blend well.
  • Add powdered sugar slowly, until you reach the consistency you like.
  • Frost/pipe onto cupcakes and sprinkle with cinnamon if desired

Cream Cheese Frosting Recipe

  • 2 - 8oz packages full-fat cream cheese, softened
  • 1 stick unsalted butter, softened
  • 2 tsp vanilla
  • 9 cups powdered sugar (2 bags = 8 cups) [This amount makes it stiff enough to pipe]
  • Sugared Pecans (optional -- Recipe below)

Preparation

  • Cream the cream cheese and butter until well combined and fluffy.
  • Add vanilla, mix in.
  • Add powdered sugar slowly, until you reach the consistency you like.

Sugared Pecan Recipe

  • 1/2 c finely chopped pecans
  • 3 tbsp sugar

Preparation

  • In a heavy skillet, cook pecans and 2 tbsp sugar on LOW heat, about eight minutes, until sugar is melted.
  • Spoon pecans onto waxed paper in thin layer, and sprinkle with remaining sugar.

Tuesday, November 23, 2010

Diabetic Friendly Chocolate Mousse Pie

Here's another good recipe! Good in many different ways, too. Good: For you; for your wallet; if you have a busy schedule.
You only need four ingredients: A ready-to-use graham cracker crust, one box of pudding, one container of Cool Whip, and milk. What makes it healthy is that the pudding is sugar-free and fat-free, and the Cool Whip is fat-free as well. (An optional fifth ingredient is chocolate for the chocolate curls on top.) I honestly didn't look at the nutrition facts for the crust, but I think with how healthy the mousse is, it shouldn't make that big of an impact.
Chocolate curls are SO fun to make! Now, online it says to use a cheese slicer, and a large block of chocolate. I used a vegetable peeler, and a chocolate bar. The trick is to make the chocolate soft enough that it'll sculpt into the form you want, but if it's too soft it'll just melt. I just bought a regular Hershey's bar and practiced with it. Now, this takes away from the 'diabetic friendly' label, but it's completely optional!

Diabetic Friendly Chocolate Mousse Pie Recipe
  • 1 ready-to-use graham cracker crust (Chocolate, if possible)
  • 1 - 1.5oz package sugar-free/fat-free chocolate pudding mix
  • 1 2/3 c skim milk
  • 1 - 8oz container fat-free Cool Whip, thawed
  • OPTIONAL:
  • Chocolate curls, or chocolate chips

Preparation

  • In a large bowl, whisk together pudding powder and milk.
  • Once well combined, add 4oz (1/2 container) of Cool Whip. Fold in carefully-- over mixing will cause the Cool Whip to lose its form.
  • Spoon into crust and smooth out.
  • Top with remaining Cool Whip, and chocolate curls if desired.

Chocolate Curls Recipe

  • One bar of chocolate (or a few, for practice)

Preparation

  • Put patterned-side down and carefully heat in microwave, making sure not to melt the chocolate. (I used a paper plate, but cut off the raised edges so I could have a flat surface to work on.) Heat ~ 10-15 seconds on 70% heat.
  • Using a vegetable peeler, carefully guide the blade along the chocolate.
  • The amount of pressure/speed will determine how large or loose your curls are.
  • If the chocolate flakes, put it in the microwave for a few more seconds.

Tuesday, November 16, 2010

Almond Bark Popcorn

One of the best tastes in the world is when sweet and salty are combined-- it's why chocolate covered pretzels are so good! As it gets closer to the holidays, I find myself craving all of the holiday treats that I haven't had in a whole year.
This is one of my favorites! Fast, easy, delicious, and sooo tasty. Trust me when I say that you can't eat just one bite of this. You'll be lucky if you don't eat the whole batch. ;)
I overdid it on the Almond Bark, so do NOT add a whole block of it like I did. It just didn't look like the popcorn was completely covered, so I kept adding more. It's still great, but the sweetness overwhelms the popcorn. 2/3 of a block would probably be a much better amount.

Almond Bark Popcorn Recipe
  • 1 bag of 'natural'/unbuttered popcorn
  • 2/3 package of white Almond Bark

Preparation

  • Pop popcorn according to the instructions on the bag.
  • Empty into a large bowl, and pick out any unpopped kernels ("old maids" as my mom calls them!) or burnt pieces.
  • Melt Almond Bark according to instructions on the package.
  • Pour over popcorn, then use a mixing spoon to mix the two together.
  • On a large sheet of wax paper, pour the popcorn from the bowl and use the spoon to press it out into a thin layer.
  • Let cool/dry completely.
  • Once hard, break off into pieces and serve or store.

Sunday, November 7, 2010

Pumpkin Fro-Yo Pie

At work, we'll be getting "yogurt pies" soon! Think of it as a twist: Instead of ice cream cake, it's frozen yogurt pie. Nomnomnom.

Being the impatient person that I can be, I wanted to try one out myself. A couple of days ago our pumpkin yogurt was being changed out, so after work I filled up a cup with that and only that, and brought it home. I had a graham cracker crust waiting to be used too, so I thought, perfect!
This is the easiest, and strangest, and most delightful pie! Pumpkin yogurt, for example, tastes exactly like pumpkin pie. (Or in my case, better, as I've never been much of a normal pumpkin pie girl.) It just adds this odd new element! Plus, you only need two ingredients and a freezer.

I can only assume that this will work best with soft-serve frozen yogurt, not ice cream because the consistencies are different. With all of the fro-yo stores popping up, I bet it'd be easy to find one, and then all you have to do is pick your flavor!
Pumpkin Fro-Yo Pie Recipe
  • 16 oz (1 pint) of frozen yogurt, your choice (more if you don't want that top 'lip' of crust)
  • 1 - 9" graham cracker crust

Preparation

  • Preheat oven to 250
  • Heat crust for about 10 minutes, just to firm up. Then let cool completely.
  • Pour yogurt into crust, and smooth out/flatten with a rubber spatula.
  • Put into freezer for ~3 hours (or overnight) to fully firm up.
  • Serve!

Saturday, October 30, 2010

Oreo Ghosts

I was going to post this on Halloween, but I figured I'd post it the day before in case you want to actually make these festive treats!

Oreo ghosts are the same as oreo balls, just shaped differently. I also consider them easier to make, too, because with oreo balls you roll them, then freeze them, then dip them. With the ghosts you shape them, then spoon the almond bark right over them!
With these, it's definitely a "slow and steady" scenario. If you quickly dump the almond bark on, it'll get lumpy and won't cover evenly. So instead, go slowly. Spoon a decent amount over with a plastic mixing spoon (it acted weird when mom and I tried to use a metal spoon) and then use the back of the spoon to guide the almond bark where you want it to go.

Be sure you add enough for them to have a cute little "skirt" at the base, to make sure they really look like ghosts!
Adding the eyes is the most fun part to me!

Let the almond bark completely harden before adding the eyes, or you risk the almond bark simply sinking back into itself, or cracking the soft shell. Take a toothpick, and push it through the almond bark. If you twist the toothpick once embedded, you can create a larger eye socket.
And be sure to experiment with different little shapes! My favorite is the ghost with his little ghost head cocked! It's love at first spook. ;)

Oreo Ghost Recipe

  • One package Oreos
  • One package full-fat cream cheese, softened
  • One package white Almond Bark

Preparation

  • Finely crush the Oreos. (Mom and I used a food processor this time. Or, put them in a large bag, and smash up with a rolling pin.)
  • In a large bowl, blend together with cream cheese until fully combined.
  • Chill for 30-60 minutes, to make it easier to handle.
  • On a sheet of wax paper, roll out oreos to 1-2" tall, with varying heights and widths.
  • Chop up and melt Almond Bark, adding in vegetable oil if necessary to make it runny enough.
  • Spoon A.B. over the oreo shapes, using the spoon to guide it along the ghosts to make sure they're fully covered. (Watch out for their butts! Mom and I miss those most often.)
  • Let fully harden, then use a toothpick to form their eyes.


Thursday, October 28, 2010

Candy Melt Pretzels

Halloween is fast approaching! Today mom came up and we made treats.

I don't know if they have a name, but she's made them before for Christmas, and wanted to make Halloween ones! Notice how they're all Halloween colored?
And since they use pretzels, candy melts, and M&Ms, I figure "Candy Melt Pretzels" is easy enough.

These are easy. SO easy, in fact, that I don't even need to put a recipe guide below. I will anyway, but it's astonishing how easy these are. I mean..have I mentioned how easy they are?
I'm just going to fill up this post with pictures!

Candy Melt Pretzels Recipe

  • One package pretzel Snaps (The square/grid kind)
  • Candy Wafers (Purchasable at craft stores like Hobby Lobby, and Wal-Mart)
  • M&Ms (one large, or a few small bags)

Preparation

  • Preheat oven to 200
  • Arrange Snaps on a cookie sheet, in one flat layer.
  • Top each with one candy wafer (the color is your choice!)
  • Put into oven for 2-3 minutes, until you can press an M&M into the wafer without any resistance.
  • Remove from oven, press M&Ms into remaining wafers. Let cool/harden!

Tuesday, October 26, 2010

Reverse Chocolate Chip Cookies

Alright, so these might have another name, but I prefer the one I gave them. Today I made chocolate cookies, with white chocolate chips!
(Arg, stupid picture rotating! There HAS to be a way to fix it..) I had the same issue today that I always have with chocolate cookies, no matter what: I can never tell when they're done. I may or may not have also burned a pan...but I can't tell. Sad, right? The ones I ate were tasty, though! But then, I also like white chocolate.
I know I should've baked yesterday, but there was too much going on! I had to enroll for my classes today too, and skipped today's class to make sure I got my next semester lined up correctly, so I baked while I waited! ..I'm a good student, I swear.

The only suggestion I have is that, if you know a tip to tell when a chocolate cookie is done, use it. And possibly share it with me. Otherwise, they were delicious. Enjoy!

Reverse Chocolate Chip Cookie Recipe
  • 6 oz milk chocolate (chips probably work-- I used Hershey's Bliss squares because it was all I had)
  • 1 c butter, softened
  • 1/2 c sugar
  • 2 tsp vanilla
  • 2 eggs
  • 1/3 c unsweetened cocoa powder
  • 1 tsp baking soda
  • 1/2 tsp salt
  • 2 c flour
  • 6 oz white chocolate chips

Preparation

  • Preheat oven to 375
  • Melt the milk chocolate (microwave for 30 seconds, stir, then heat in 10 second increments until done) and set aside to cool.
  • Cream together butter, sugar, and vanilla until well mixed.
  • Add eggs one at a time, beating together between each.
  • Add the melted, cooled chocolate. Beat on low.
  • Add in cocoa powder, baking soda, and salt, and beat well.
  • Gradually add in flour.
  • Once well combined, stir in the white chocolate chips.
  • Shape dough into 1" balls, and drop onto baking sheet.
  • Bake for 8-10 minutes.
  • Leave on the pan for 1-2 minutes to set, then transfer to wire rack to cool.

Monday, October 18, 2010

Orange Dreamcicle Cheesecake

Laura and I took a daytrip to the Louisburg Cider Mill this weekend! Suuuuch a fun day!

It's like heaven in a country store!

Along with all of the cider, and cider doughnuts I bought, I also bought a jar of peach butter, some caramel apple sprinkles (which taste like french vanilla, actually), and a package of "orange dreamcicle cheesecake mix." (OH! AND SORRY! The next two pictures did that automatic-rotate thing and I can't get them back. Head, meet shoulder.)

I'm trying to find a recipe to use peach butter in, but no luck so far, and I might do something with the cider, but for now I went with the mix.
You can't buy this mix in any regular store I don't think, but you CAN order it online. The cheesecake was really really sweet, but reminded me of those orange ice cream push-pops-- you know, the Flinstones ones. Quite tasty! You can buy the mix at http://www.peculiarspice.com/ named for Peculiar, Missouri. You can probably make this from scratch too, but I never would've thought of it!

Hamilton helped me today, instead of Maisy! (aka: handheld vs kitchenaid)

Orange Dreamcicle Cheesecake Recipe

  • 1 package O.D.C. mix (see website above)
  • 2 - 8oz packages cream cheese, softened
  • 3/4 c milk
  • 1 graham cracker crust

Preparation

  • Combine packaged mix, cream cheese, and milk in a large bowl. Beat until well blended.
  • Put into graham cracker crust.
  • Chill until served!

Caramel Brownies

Occasionally my roommate will decide to have a girl's night. So this time I decided to make a little treat: Brownies!

This is partially because I already had a box of brownie mix in the cabinet, but also because I had some little caramel squares in the cabinet that I wanted to get rid of. Otherwise I would've eaten them all plain!

So I made the brownies, and then melted 20 of the caramel squares. Now, no matter how much you heat these, they will firm up again right away...at least the way I did it! So I melted them and stirred in a little veggie oil, just to get it liquid enough to drizzle the caramel over the brownie mix before I baked it.

And the caramel will harden as you drizzle, so make sure you work quickly!

Caramel Brownie Recipe

  • One box of brownie mix
  • Eggs (2, probably)
  • Vegetable oil
  • Water
  • 20 small caramels

Preparation

  • Prepare brownie mix according to directions on the back of the box.
  • Pour mix into the pan of your choice (ex: 9x13 pan)
  • Unwrap the caramels (yep!) and put in a microwave safe bowl.
  • Heat on high for 30 seconds, then stir. Add in a little vegetable oil, then continue heating in 10-second intervals until totally melted.
  • Use a spoon to drizzle caramel over the brownies.
  • Bake according to the box's directions.
  • Frost if you'd like, or serve slightly warm!

Monday, October 11, 2010

Red Velvet Cake

CONGRATS, DEREK AND NYSSA!

My co-worker Derek proposed to his girlfriend on the 9th, and she said yes!

He actually asked me to take anniversary pictures and engagement pictures for them (He asked her the day of their 5.5 year anniversary) and requested that I also make her favorite dessert -- Red velvet cake -- as a bonus. Typically, I'd whine about how much stress I'd be under to do it all, but this was a big day, you know?
So I took a page out of the "Semi-homemade" book, and bought a boxed cake mix but made the frosting myself.

Since I've really started focusing on baking, I've had a hard time eating those jarred frostings you buy at the store. Now, if I'm in the right mood I can gobble down the chocolate frosting with no problem. But the canned cream cheese frosting.... ugh. Just ugh.
The frosting I made was AMAZING. I almost kept the cake for myself, but that wouldn't be right.. I like my cream cheese frosting much more cream-cheesy, and less sugary-sweet. Apparently it's the same recipe my mom uses, except she uses a few cups more of powdered sugar.

This was also my first time decorating a cake!! I don't make them often (ever) so it was fun! I'm surprised at how pretty it came out. Very regal, or at least I'll convince myself that it is.
Red Velvet Cake Recipe
  • One box red velvet cake mix
  • 3 large eggs
  • 1 1/4 c water
  • 1/3 c vegetable oil

Preparation

  • Prepare cake according to box directions.
  • Let cool completely. If needed, cut off the rounded tops (for 2 - 9in cakes) before frosting.

Cream Cheese Frosting Recipe

  • Note: I mixed the recipe to have 1.5 the amount it originally called for, in order to have enough to pipe the decor on. If you don't plan on this, remove a third of the recipe from your measurements.
  • 3 (8oz) packages of cream cheese, softened
  • 3/4 c butter (1 1/2 sticks), softened
  • 3 cups powdered sugar
  • 1 1/2 tsp vanilla

Preparation

  • In large bowl (medium if using 2/3 of the recipe) cream together the cream cheese and butter.
  • Mix in vanilla.
  • Slowly add in powdered sugar, stirring the edges constantly to make sure it's evenly distributed.

Note: You should store this cake in the fridge because of the frosting. Enjoy!